User Interface (UI) Overview
The File Menu
The top navigation bar of the R-THYM editor contains several drop-down menus for managing your project and interacting with the system. The File menu handles all the core actions related to saving, loading, and importing/exporting your network data.
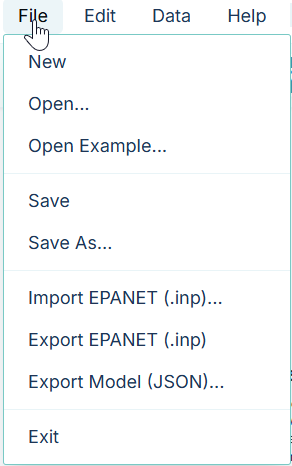
Here is a breakdown of every option in the File menu:
- New: Clears the canvas and initializes a blank, untitled project. (Note: Be sure to save your work first, as unsaved changes will be cleared!)
- Open...: Navigates back to your Dashboard, where you can select and load any of your previously saved projects from the cloud.
- Open Example...: Navigates to the Example Projects section of your Dashboard, allowing you to load pre-built benchmark models.
- Save: Commits your current workspace to the cloud database. If this is a newly created or cloned example project, it will prompt you for a project name.
- Save As...: Duplicates your current workspace into a new project slot. This is perfect for creating a "Version 2" of your model before making drastic changes.
- Import EPANET (.inp)...: Opens a file dialog allowing you to upload an existing EPANET
.inpfile from your local hard drive. R-THYM will instantly parse the file and render the network onto the interactive canvas. - Export EPANET (.inp): Generates and downloads an EPANET-compatible
.inpfile of your current network topology. This allows you to easily share your geometry with colleagues or run it in legacy desktop software. - Export Model (JSON)...: Downloads a complete, machine-readable archive of your entire R-THYM project state. Unlike the EPANET
.inpformat, which is strictly limited to hydraulic network data. This JSON file contains your entire project configuration, including power topology, control links, canvas chart settings, and custom node properties. This is the ideal format for archiving your full work or performing external programmatic analysis. - Exit: Closes the editor and returns you to your main Dashboard.
Mastering the File menu ensures you never lose your progress and can seamlessly transition data between R-THYM and legacy desktop tools.